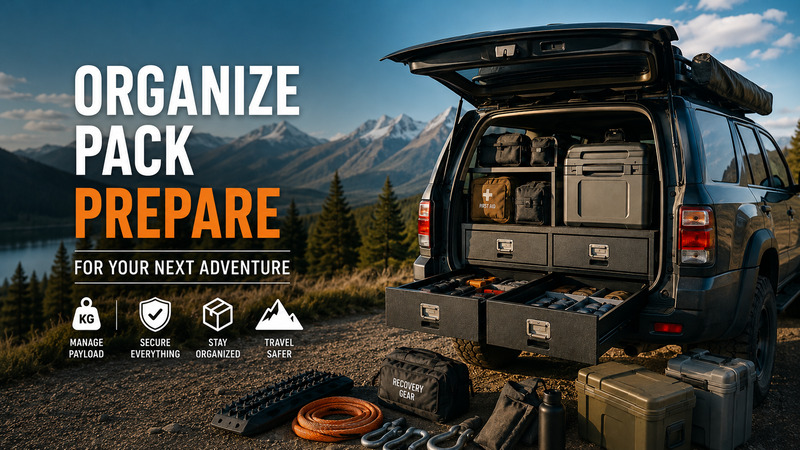

A successful overlanding adventure begins long before the tyres reach a gravel road.
Choosing a capable vehicle is important, but the way you pack, position and secure your equipment can have an even greater effect on safety, handling and comfort. Poorly distributed cargo can make a vehicle difficult to control, while unsecured items can become dangerous during sudden braking or rough-road driving.
An effective storage system should achieve four things:
- Keep the vehicle within its permitted weight limits
- Maintain stable and predictable handling
- Prevent equipment from moving during the journey
- Make essential supplies easy to access
The following strategies will help you create a safer, lighter and more practical setup for overlanding, camping and long-distance road trips.
Start With Your Vehicle’s Payload Capacity
One of the most common overlanding mistakes is buying storage systems, roof racks, refrigerators and camping equipment before checking how much weight the vehicle can safely carry.
Every vehicle has a maximum permitted operating weight. Depending on the country and manufacturer, this may be described as the Gross Vehicle Mass, Gross Vehicle Weight Rating or Maximum Authorised Mass.
This limit includes the combined weight of:
- The vehicle
- The driver and passengers
- Fuel
- Wasser
- Food
- Luggage
- Camping equipment
- Recovery equipment
- Storage systems
- Permanently installed accessories
- Anything carried on the roof
Your approximate available payload can be calculated using the following formula:
Maximum permitted vehicle weight − actual vehicle weight = remaining payload
However, the kerb weight shown in a vehicle brochure may not include accessories that have been added after purchase.
Bull bars, larger tyres, drawer systems, auxiliary batteries, roof racks, underbody protection and spare-wheel carriers can consume a significant portion of the available payload before passengers and luggage are added.
For the most accurate measurement, take the fully loaded vehicle to a certified weighbridge. Ideally, check both the total vehicle weight and the load placed on each axle.
A vehicle can remain below its overall weight limit while still exceeding the permitted load on the front or rear axle.
Do Suspension Upgrades Increase Payload?
Not necessarily.
Heavy-duty springs and upgraded shock absorbers may reduce suspension sag and improve handling, but they do not automatically increase the manufacturer’s certified weight limits.
An official payload increase usually requires approved engineering work, testing and documentation that complies with local regulations.
Drivers should never assume that a vehicle can safely carry more weight simply because the suspension appears level.
Reducing unnecessary weight is often a more effective strategy than attempting to compensate for an overloaded vehicle with suspension upgrades.
Renting Versus Building an Overlanding Vehicle
A personally modified overlanding vehicle gives you complete control over storage, electrical systems, recovery equipment and camping accessories.
This can be an excellent option for frequent travellers or long-term expeditions. However, shipping a personal vehicle overseas or completing an expensive touring conversion may not be practical for a short international holiday.
Travellers planning a European mountain journey or scenic coastal road trip may find it easier to book a reliable vehicle through a local provider.
Renting a suitable SUV or four-wheel drive eliminates the cost and complexity of transporting your own vehicle. It can also provide access to a vehicle that is already suited to local roads and driving conditions.
Before confirming a rental, check whether:
- driving on gravel or unsealed roads is permitted
- cross-border travel is allowed
- tyre and underbody damage is covered
- type of spare tyre is included
- the vehicle has suitable ground clearance
- recovery tools are supplied
- roadside assistance covers remote areas
- there are restrictions on specific routes
Do not rely solely on the vehicle’s appearance or four-wheel-drive badge. Some rental SUVs are fitted with road-focused tyres, temporary spare wheels or insurance policies that exclude off-road use.
Before leaving the rental location, inspect the tyres, photograph the vehicle and locate the jack, spare wheel and towing points.
Choose Lightweight Storage Materials
Permanent storage systems can consume payload surprisingly quickly.
A large steel canopy or drawer system may be strong, but its empty weight reduces the amount of water, food, tools and safety equipment the vehicle can legally carry.
Aluminium is widely used for touring storage because it offers a strong balance between weight, durability and corrosion resistance.
A well-designed aluminium storage box can be considerably lighter than a comparable steel product. This allows travellers to preserve more of the vehicle’s payload for essential equipment.
Marine-grade aluminium alloys are particularly useful for storage systems exposed to:
- Rain
- Coastal air
- Staub
- Mud
- Humidity
- Repeated vibration
These qualities help explain the popularity of the weather-resistant tool boxes ute drivers use for outback touring.
However, material should not be the only consideration. Before purchasing a storage box, inspect:
- The empty weight
- Lock and hinge quality
- Dust and water seals
- Mounting-point strength
- Internal reinforcement
- Drainage design
- Replacement-part availability
- Ease of removal
A removable storage box may be more practical than a permanent drawer system for people who use the same vehicle for commuting and occasional road trips.
Pack Heavy Equipment Low and Close to the Centre
The safest place for an item is not simply wherever it fits.
Dense equipment should generally be stored as low as possible and close to the area between the vehicle’s front and rear axles.
In an SUV, heavy supplies should be placed on the cargo floor rather than stacked near the roof.
In a pickup or ute, avoid concentrating heavy equipment at the very rear of the tray. Excessive weight behind the rear axle can reduce the load on the front wheels, affecting steering response and braking stability.
Items that should normally remain low include:
- Water containers
- Fuel containers
- Recovery equipment
- Tool kits
- Spare parts
- Batterien
- Portable refrigerators
- Heavy cooking equipment
The load should also be balanced from side to side.
Placing a refrigerator, auxiliary battery and water supply on the same side of the vehicle can create a noticeable imbalance, particularly on uneven tracks.
Minimise Heavy Roof Loads

Roof racks are useful when interior space is limited, but they should be loaded carefully.
The roof is best used for bulky, lightweight items such as:
- Bedding
- Lightweight tents
- Folding chairs
- Traction boards
- Empty storage bags
- Awnings
Avoid placing heavy tools, fuel containers or large water containers on the roof.
Heavy roof loads raise the vehicle’s centre of gravity. This can increase body movement and reduce stability during sudden steering changes, steep descents and off-camber driving.
Always check both the vehicle manufacturer’s roof-load limit and the roof-rack manufacturer’s rating. Follow the lower of the two limits.
It is also important to distinguish between static and dynamic roof-load ratings.
The static rating applies when the vehicle is parked. The dynamic rating applies while the vehicle is moving and is usually much lower.
Treat Every Loose Object as a Potential Hazard
Cargo securement is not limited to equipment carried on an external rack.
Loose objects inside the passenger cabin can cause serious injuries during sudden braking, a collision or a rollover.
A water bottle, camera, torch or tool may seem harmless while the vehicle is stationary. During rapid deceleration, however, it can travel through the cabin with considerable force.
Use appropriate equipment to secure your cargo, including:
- Load-rated tie-down straps
- Factory cargo anchors
- Cargo barriers
- Enclosed drawers
- Zipped organisers
- Secure refrigerator mounts
- Properly fitted cargo nets
Avoid relying on elastic cords for heavy equipment. They may be suitable for lightweight items, but they are not a substitute for rated straps.
Once the vehicle has been packed, push and pull each container firmly.
If an item moves during this test, it is likely to move while driving on corrugated roads, steep tracks or rough terrain.
Build a Modular Packing System
A modular storage system makes equipment easier to locate and prevents you from unloading the entire cargo area whenever one item is needed.
Divide your supplies into clear categories.
Recovery and Roadside Equipment
This category may include:
- Recovery straps
- Rated shackles
- Tyre repair equipment
- Air compressor
- Work gloves
- Warning triangle
- Folding shovel
Mechanical Tools and Spare Parts
Include:
- Hand tools
- Replacement fuses
- Hoses
- Belts
- Fasteners
- Vehicle-specific spare parts
Cooking Equipment
Keep the following items together:
- Camping stove
- Cookware
- Utensils
- Cleaning supplies
- Dry ingredients
- Food preparation tools
Camping Equipment
This category may contain:
- Bedding
- Beleuchtung
- Tent accessories
- Folding furniture
- Tarps
- Camp tools
Medical and Personal Safety Equipment
Store these items in a clearly marked container:
- First-aid supplies
- Medication
- Sunscreen
- Insect repellent
- Emergency contact information
- Personal protective equipment
Technology and Navigation Equipment
Use a dedicated organiser for:
- Charging cables
- Power banks
- Kameras
- Radios
- Navigation devices
- Spare batteries
- Memory cards
Choose containers that can be opened without removing several other boxes first.
Clear lids can make supplies easier to identify, while durable labels remain useful when containers are exposed to dust or direct sunlight.
Colour-coded labels or straps can also improve organization. For example:
- Red for emergency supplies
- Blue for water equipment
- Yellow for electrical accessories
- Green for cooking equipment
Organise Equipment by Access Priority
Not every item needs to be equally accessible.
A practical system is to divide your supplies into three access levels.
Immediate-Access Equipment
These items should be reachable without unloading the vehicle:
- First-aid kit
- Fire extinguisher
- Warning triangle
- Torch
- Tyre pressure gauge
- Air compressor
- Recovery gloves
- Drinking water
- Rain jacket
- Basic tool kit
Emergency equipment should never be buried underneath luggage or camping supplies.
Daily-Use Equipment
Cooking gear, food, chairs, toiletries and frequently used clothing should be stored near the rear door, tailgate or an exterior compartment.
These items will be accessed regularly, so they should not require the entire vehicle to be unpacked.
Occasional-Use Equipment
Backup food, spare parts and specialised recovery tools can be stored deeper in the vehicle.
Make sure they remain secured and record their location in a packing checklist.
Use Technology to Improve Vehicle Organization
Physical organization remains the foundation of a safe overlanding setup, but a few carefully selected gadgets can make the journey easier.
Offline Navigation
Download maps before travelling into areas with unreliable mobile coverage.
Store important coordinates and route information on more than one device. Carry a charging solution that does not depend entirely on the vehicle’s starter battery.
A paper map can also provide a valuable backup if electronic devices fail.
Tyre-Pressure Monitoring
An aftermarket tyre-pressure monitoring system can alert the driver to changes in tyre pressure or temperature.
This can be useful after adjusting tyre pressures for gravel, sand or rocky terrain.
Electronic sensors should support, rather than replace, regular visual inspections and manual pressure checks.
Digital Packing Inventory
Create a shared checklist that all travellers can access from their phones.
The list may include:
- Equipment locations
- Food quantities
- Water levels
- First-aid contents
- Battery status
- Maintenance tasks
- Emergency contacts
Make sure the checklist can be accessed offline.
Bluetooth Trackers
Bluetooth trackers can help locate keys, bags and removable equipment around a campsite.
However, their performance may depend on nearby phones or network coverage. They should not be treated as emergency beacons or satellite tracking devices.
Battery Monitoring
A battery monitor can display the condition of an auxiliary power system and help prevent refrigerators, lights and other accessories from draining the battery unexpectedly.
All electrical accessories should be installed with appropriate wiring and fuses.
Avoid connecting several high-powered devices through an unsuitable cigarette-lighter adaptor.
Create a Dedicated Recovery Zone
Recovery equipment should be stored separately from general camping supplies.
If a vehicle becomes stuck, the driver may be dealing with mud, darkness, heavy rain or passing traffic. Opening several boxes to find one shackle or strap wastes time and increases risk.
A dedicated recovery zone may include:
- Rated recovery strap
- Rated shackles or soft shackles
- Recovery-point equipment
- Recovery dampener
- Work gloves
- Folding shovel
- Tyre deflator
- Air compressor
- Tyre repair kit
- Torch or headlamp
Recovery equipment should be easy to reach without completely unloading the vehicle.
After use, allow wet or muddy straps to dry before storing them for an extended period. Inspect all equipment regularly for damaged stitching, corrosion, cuts and abrasion.
Recovery equipment must also be compatible with the vehicle. A high-strength strap cannot make an unsuitable attachment point safe.
Separate Water, Fuel and Electronics
Liquids should be stored upright and secured against movement.
Fuel should be carried in approved containers and kept outside the passenger compartment wherever possible. Check local regulations, as some regions restrict how much fuel can be transported and where it can be stored.
Water containers should be kept away from sharp tools and electrical systems.
Position them where a minor leak will not damage batteries, wiring, food or emergency supplies.
Sensitive electronics should be stored in padded, weather-resistant cases. Small moisture absorbers may provide additional protection in humid conditions, provided they are maintained according to the manufacturer’s instructions.
Test the Vehicle Before the Trip
Your first fully loaded drive should not be the beginning of the holiday.
Pack the vehicle as it will be used, fill the water containers, add the passengers and complete a local test drive.
Pay attention to:
- Steering response
- Braking performance
- Body movement
- Suspension height
- Unusual rattles
- Tyre clearance
- Visibility through windows and mirrors
- Access to emergency equipment
After the test drive, inspect every strap, latch and mounting point.
Loads can settle once the vehicle begins moving, which may cause tie-down straps to loosen.
For a heavily equipped vehicle, complete a final weighbridge check in its fully loaded touring configuration.
This is more accurate than estimating the combined weight of dozens of individual items.
Complete a Five-Minute Daily Reset
Even a carefully organised vehicle can become cluttered after several days on the road.
At the end of each day:
- Return tools and cooking equipment to their assigned containers.
- Remove rubbish from the cabin.
- Check that all boxes are closed and latched.
- Tighten tie-down straps where necessary.
- Inspect roof-mounted equipment.
- Confirm that emergency supplies remain accessible.
- Recharge essential electronics.
- Update your water, food and fuel inventory.
A brief daily reset prevents minor clutter from turning into a major packing problem.
Vehicle Organization Checklist
Before beginning your journey, confirm the following:
Weight and Balance
- The vehicle is within its maximum permitted weight.
- Front and rear axle limits have not been exceeded.
- Heavy equipment is stored low.
- The load is balanced from side to side.
- Dense items are not concentrated behind the rear axle.
Cargo Security
- Storage boxes are securely mounted.
- Tie-down straps are load-rated.
- No heavy objects are loose inside the cabin.
- The refrigerator is properly secured.
- Roof-mounted equipment cannot move.
Safety and Recovery
- The first-aid kit is immediately accessible.
- The fire extinguisher is securely mounted.
- Recovery equipment is stored in one location.
- The air compressor and tyre repair kit are easy to reach.
- Warning equipment is available.
Water, Fuel and Electronics
- Water containers are upright and secured.
- Fuel is carried in approved containers.
- Liquids are separated from electrical equipment.
- Batteries and accessories are correctly fused.
- Offline navigation is available on more than one device.
Rental Vehicles
- Unsealed-road restrictions have been checked.
- Insurance exclusions are understood.
- The tyres and spare wheel have been inspected.
- Roadside assistance coverage has been confirmed.
- Existing vehicle damage has been photographed.
Frequently Asked Questions
Begin by calculating the vehicle’s available payload. Store heavy equipment low and close to the centre of the vehicle, divide supplies into labelled categories and keep emergency items immediately accessible.
Every item should have a fixed location and be secured against movement.
Aluminium boxes are generally lighter and resistant to red rust, making them useful for wet, humid and coastal environments.
Steel boxes can provide excellent durability and may be more affordable, but they are usually heavier.
Compare the complete product’s weight, construction, seals and mounting system rather than choosing based on material alone.
Heavy recovery equipment is usually safer when stored low in the vehicle.
The roof is better suited to bulky, lightweight items. Recovery tools should also be accessible without climbing onto the roof or unloading unrelated equipment.
Check the vehicle’s official maximum weight and axle limits, then weigh it in its fully loaded touring configuration at a certified weighbridge.
Do not rely solely on the appearance of the suspension or the way the vehicle feels while driving.
A rental SUV may be suitable for maintained gravel roads and moderate touring routes, but the rental agreement must be checked carefully.
Confirm road restrictions, tyre condition, insurance exclusions, spare-wheel equipment and roadside assistance coverage before travelling.
Your first-aid kit, fire extinguisher, warning equipment, drinking water, torch, tyre-repair supplies and basic recovery tools should remain accessible without unloading the vehicle.
Die Quintessenz
Effective vehicle organization is not about filling every available space.
It is about carrying the right equipment while protecting the vehicle’s payload, handling and occupants.
Begin with accurate weight information. Choose storage products that provide durability without consuming unnecessary payload. Position heavy supplies low, secure every object and keep emergency equipment within easy reach.
Technology can improve navigation, tyre monitoring, power management and inventory control, but it should support rather than replace sound physical preparation.
When every item has a secure position and a clear purpose, the vehicle becomes safer, campsite setup becomes faster and the journey becomes considerably less stressful.
That leaves you with more time to enjoy the landscapes and experiences that made the road trip worthwhile.